I considered calling this post Google Giveth and Google Taketh Away.
On December 7th, 2012, Google Apps Free users around the world received the following “Google Apps customer notice”:
What? Google Apps isn't free anymore!?
To be honest, I was pretty pissed. Google Apps Free was really only useful for tiny businesses (up to 7 employees), because that's maximum number of accounts you could have. My hunch is that most free users only had one or two free accounts.
At first, I saw this as Google needlessly targeting small businesses who probably can't afford to pay $5 per month for premium email.
After all, Email is free, right?
Well, not exactly. In fact, it was Google who convinced us that Email should be free in the first place, with the precipitous rise of the now ubiquitous free Gmail.
Plus, $5 per month isn't the end of the world.
If the service hadn't already been available for free, I would say that $5/month is a great bargain.
For anyone with a business who needs more than one email account, Google Apps is still the way to go.
It requires some technical skills and patience, but once things are working, you won't have to think about it again.
Here's what you'll need:
- A (free) Gmail account. It can be an existing one you already have, or if you want your business email to go to a separate inbox, open a new account.
- Access to your Web Hosting/Domain Registration settings
- That's it
First, you'll set up your email account with your Hosting service.
This is different for every web host (I prefer BlueHost), but you'll need to log in, find the place where you manage your email accounts, and add the account that you want. Most people go with you@yourdomain.com
Next, you need to tell Gmail where to get this email
Somewhere in the same section of your hosting settings, there will be instructions for checking your mail via a POP client. There will be a server address, and login information. Write that down.
Now, in your gmail account go to Settings>Accounts and Import and scroll down to the Check mail from other accounts (using POP3) section. Click on Add a POP3 Mail Account You Own

Follow the Wizard
Gmail will now lead you through the 4-step process to adding a POP3 account. Make sure to keep that server info handy that you wrote down earlier.
Success?
If all goes well, any email sent to the you@yourdomain.com account will show up in your Gmail inbox.
But wait! There's one more thing (important).
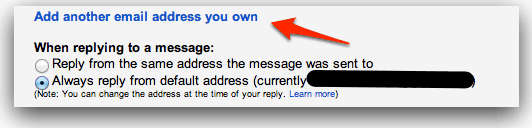
If someone emails you@yourdomain.com and then you respond to that email, your response will come from your Gmail account. Now that's not professional. Let's fix it!
Back in Settings>Accounts and Import, add the you@yourdomain.com email address to the Send Mail As list, and set this address as the default. That way, whenever you send a message from your “Gmail” account, it will look like it came from you@yourdomain.com
Whew, I'm glad we made it through that together.
What's that? You got stuck?
Pat yourself on the back for trying, and don't worry too much!