Live and work in harmony with technology
Today I’m going to teach you how to start a WordPress blog. It's surprisingly easy to set up a self-hosted WordPress blog in just a matter of minutes!
Why WordPress?
You’ve probably heard all kinds of things about WordPress, but one thing remains the same: WordPress is the absolute best platform if you want to have a blog-based business. With powerful plugins that can extend the platform into eCommerce, Membership Sites, Forums and more, WordPress is the best!
Additionally, when you self-host a WordPress site (rather than paying someone like wordpress.com), you have total control over your website. It’s the setup that I’ve been using to host my websites for close to 10 years and I have no intention of changing that any time soon!
So before we begin, here are some basics to help you understand what we’re going to do:
First, we’ll register a domain name for you. Your domain name is like your digital address: For example, my domain name is cloud-coach.net.
Next, we’ll set up your web hosting. If your domain name is your house, web hosting is the digital land where you’ll put it. We’ll use my favorite web host, Bluehost to to take care of this.
Finally, we will install WordPress on your web host. WordPress is open source software, so anyone is free to use it as they see fit.
I know this sounds complicated now, but you’ll be amazed how easy I make it for you.
Here we go!
Step 1
Click this link to visit the signup page on bluehost.com. You’ll see something like the following. Click the Get Started Now button.

Step 2: Select your hosting plan.
For most websites starting out, the Starter plan has most everything you’ll need, plus it’s an amazing price for web hosting! Click the select button on the plan of your choosing.

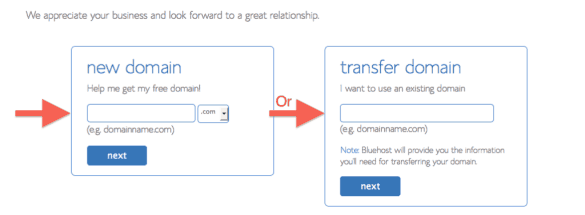
Step 3: Buy or transfer your domain name.
If you do not currently own your domain name, type your desired web address into the new domain field. Don’t worry if you’ve already bought your domain name from another provider! Type it into the transfer domain field.
Step 4: Enter your account information

Step 5: Choose your package details

You can’t go wrong with any of these options: The longer you choose to host your site, the less expensive the monthly fee is. Here’s my detailed explanation of the other options (in case you’re interested):
SiteLock Domain Security: This is a good idea if you plan to sell anything on your website, because SiteLock automatically scans your website for malware to ensure it is not being blocked or spammed.
Site Backup Pro: I highly recommend this to all new WordPress users, because you will inevitably make a mistake somewhere along the way that you wish you could just hit the “undo” button on. That’s what site backup pro does: Site Backup and Restore tool automatically makes a daily backup copy of your site to help protect you from data loss.
Search Engine Jumpstart: This is a service that will submit your new websites to search engines right away. While it is a good idea, WordPress is excellent in this area as well, so I wouldn’t recommend this option as essential.
Domain Whois Privacy: Whenever you register a domain name, your name and address is added to a public database that keeps that information for all websites. Domain privacy places Bluehost’s company information out there instead of yours. Read: way less spam and junk mail.
Step 6: Enter your billing information
This step is very straight forward. You can even pay with PayPal if you want (just click the More payment options link).
Then click the confirmation checkbox and the next button.

Step 7: Install WordPress
Congratulations… you did it! you successfully own a domain name and have web hosting! You will be directed to the account area of your BlueHost account.
Once inside your BlueHost account, Navigate to Hosting > CPanel, and click WordPress under Website Builders.

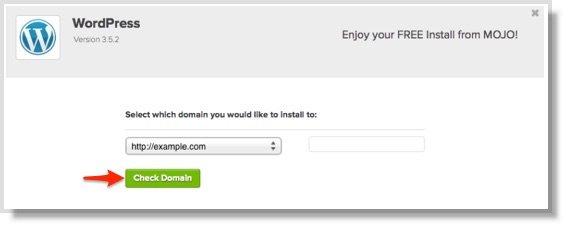
Click Start a brand new install

Select your domain from the drop down list and leave the second box blank. Click the Check Domain button.
Check the Show advanced options box and type in the name of your website, an admin username and password, and your email address. Make sure you DO NOT use the username admin and also make sure that you use a strong password. Check the box next to Automatically create a new database, and the terms and conditions box. Finally, Click Install Now.

You’ll see the installation progress bar move as WordPress is installed on your web host. Don’t forget your admin username and password!

Finally, to log into WordPress and start building your website, visit yourwebsite.com/wp-admin (where you replace yourwebsite.com with the domain name you chose earlier) and log in with your admin user name and password.

That’s it! You’ve successfully installed WordPress on your very own website. Of course, there’s much more to do, including: